DIY Surfboard Fin Box Repair: Expanding Foam vs. Foam Block Method
Ever ripped a fin on a killer wave? Out past that gnarly break, and then? Crunch underfoot. The worst. A busted fin box can trash your whole session, fast. And getting a surfboard fin box repair done right? Super important for hitting the waves again. But what’s the real deal with fixing these dings? Locales know this: sometimes it’s an easy patch. Other times, it’s a hella deep dive into foam work. We’re talking two main options for this job – expanding foam or a pre-cut block.
Expanding Foam: Quick Fix, Quirky Color
Got a fin box completely ripped out? Yeah, that’s where expanding foam shines. It’s quick. Easy. And you don’t even have to make the ding any bigger. Just mix your components. Typically a 1:1 ratio for PU blanks. Often 32kg density foam.
The trick? Pour it pronto. Into the void, I mean, as soon as that cup gets warm in your hand and the foam shows a hint of growth. Because if you wait for it to expand in the cup? Bunch of air bubbles. You don’t want that.
Once poured? Hands off! Seriously. Leave it alone for a full 24 hours. Trying to sand or laminate too early often leads to shrinkage under the fiberglass. Then you gotta start over. What a pain.
But the main bummer with this method? Color. Expanding foam tends to dry in an off-yellow. Or a light brown hue. Great for hidden repairs, yeah. Not so much for a pristine white board, though.
Pre-Cut Foam Blocks: Color Match, More Work
Want to match the tint perfect? Like, for a bright white shortboard? Then a pre-cut foam block is the only way to go. This usually makes the repair disappear. Looks pro, seriously.
The catch? You often gotta make the damaged area bigger. The goal is to rout the ding into a super simple shape. A perfect rectangle, maybe. Or a square. Something you can easily pop out of a spare foam block, right?
Cutting and sanding that block to fit perfectly is super careful work. It needs to be snug. Totally. And mark it North/South so you don’t install it backward. Then, apply plenty of resin. Get it mixed with micro-balloons, won’t drip then. Slather it inside the cavity and on the sides of your foam block. Push it in firmly. Clamp it down with tape.
And another thing: it’s definitely more time-consuming. But the final look, with that color match? Can be totally worth it.
Routing Out Damaged Fin Boxes: Take It Slow
Sometimes the fin box itself is still partially in. Just busted. Pulling it out? Delicate work. While a router or laminate trimmer can speed things up, this step has the highest potential to cause further damage. Not skilled? Take it to a pro.
When routing, go shallow. And slow. Be aware of that tiny orange ball locking fins in place – a metal bar holds it. Pounding this bar with a high-speed router bit can quickly ruin your day. Not to mention the foam around it.
Chisel off that orange plastic first, if you can. Then, carefully route down. Expose that metal bar. Use a chisel or flathead to pry it out. With the metal gone, the rest is usually just plastic. That lets you deepen your route and remove the remaining box walls.
Laminating Before Routing: A Smoother Install
Okay, pro tip. And it’s a good one: laminate your board before you rout for the new fin box. Sounds like an extra step, I know. But it seals the foam. Guards it from routing nastiness. And your concave? Perfectly shaped. Before you even touch the fin box itself. Nice, right?
It’s especially good with poly resin, which cures fast. Makes the extra time almost nothing. So, you can skip this. Glass over an installed box, sure. But doing it this way just makes for a cleaner, more precise final installation. Consider it insurance. For that pro-level finish.
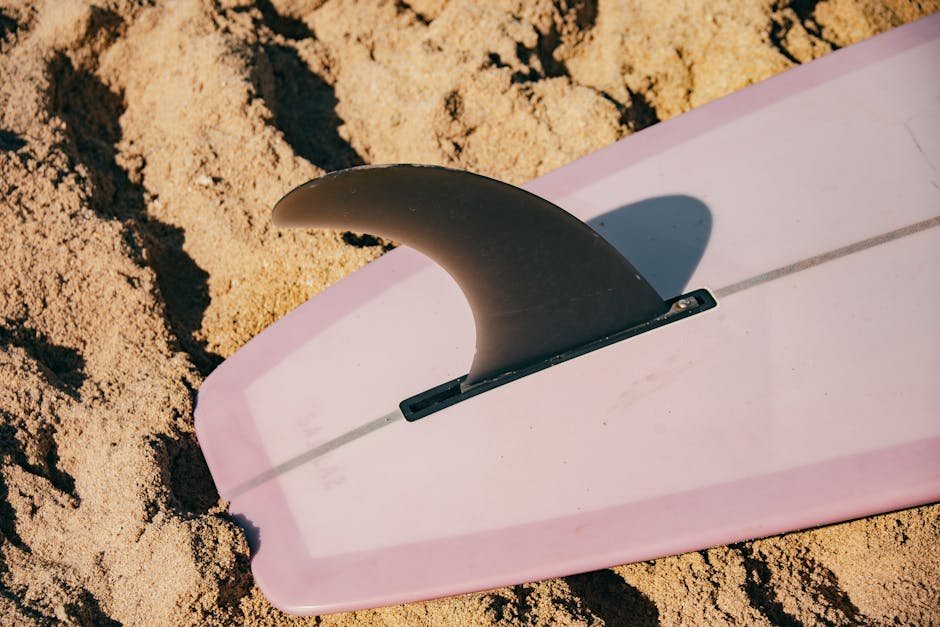
Installing a New Fin Box: Resin is Key
So, your new foam block or expanding foam fix? Glassed and sanded down. Now? Time to rout the exact slot for your fresh FCS fin box. After glassing, it should be super tight. A Dremel. Or sandpaper on your finger. Helps get that perfect, friction-fit slot.
Most critical part of this install? Resin. Lots of it. No skimping! Paint the absolute crap out of the routed hole’s inside. With resin. Then, paint the actual fin box itself. We’re talking plenty of sticky stuff.
Push the box in. You need resin oozing. Everywhere. No ooze? Pull it. More resin in the hole. Try again. Get a fin. Masking tape helps keep the angle. Hold it solid while it cures. You can either sand the box lip flat before your final lamination. Or just glass right over it. Gentle with air bubbles. Both ways? Totally fine. Your call on what feels best.
Frequently Asked Questions
Q1: Why should I consider laminating the board before routing for the fin box?
A1: Look, this step, doing the glassing before you rout the fin box? It keeps the foam safe from getting messed up while you’re routing. Plus, your concave ends up just right. And it makes putting that fin box in way more precise and clean. Super handy. Especially with poly resin because that stuff cures fast.
Q2: What’s the main difference in color outcome between using expanding foam and pre-cut foam blocks for repairs?
A2: The big thing? Color. Expanding foam usually dries to a funky off-yellow or kinda light brown. Not so hot for white boards. But pre-cut foam blocks, if they’re from a white blank, they’re gonna match way better. For seamless fixes on lighter boards. A perfect fit.
Q3: What’s the biggest risk when routing out an existing damaged fin box, and how can I avoid it?
A3: Biggest problem when routing out a busted fin box that’s still kinda there? You might hit that little metal bar, the pin, inside the fin lock mechanism. With your router bit, that is. Oh man, that’ll mess up the board super quick. To avoid it, just go slow. Shallow cuts. And hey, try chiseling out that orange plastic lock first. Before you even start routing. That way, you can get to that metal bar and pry it out safely.